

Introduction:
Apple's iOS updates are always eagerly anticipated, and with the release of iOS 17, the tech giant continues to redefine our mobile experience. This latest iteration introduces 17 game-changing features that promise to revolutionize how we use our iPhones.
In this blog, we'll explore these mind-blowing features in active voice, showcasing how iOS 17 takes mobile technology to the next level.
1. NameDrop: Share Your Information Effortlessly
iOS 17 introduces NameDrop, a game-changing feature that simplifies contact sharing. Now, you can effortlessly share your name, phone number, email, and Contact Poster by bringing your iPhone close to another device. Whether you're networking at a professional event or connecting with someone new at a bar, NameDrop streamlines contact exchange.
Steps to Enable NameDrop on iOS 17:
To use NameDrop, make sure both iPhones are running on iOS 17.
- Step 1: First, both iPhone users have to ensure that their AirDrop has been turned on.
- Step 2: Now, to make the feature work make sure the top part of the iPhones are closer to each other. You can bring the top half of the two phones closer or place one phone on top of the other.
- Step 3: A NameDrop notification will pop up on your screen; click on it.
- Step 4: Review the contact information you want to share and tap Share.
With this, the other person will receive the contact information in the form of a notification on their phone's screen. They can tap the notification to add your contact to their address book.
To cancel, simply separate the two devices before NameDrop finishes.
2. Leave a Message on FaceTime Video: Express Yourself Visually
When your FaceTime call goes unanswered, you can leave video or audio messages, capturing your message visually or audibly. This feature adds a new dimension to communication.
Steps to Use FaceTime Video on iOS 17:
To use FaceTime Video, make sure the iPhone is running on iOS 17.
- Find the person you want to call: Look through your contacts and pick the person you want to call.
- Choose FaceTime Video: You'll see two options, FaceTime Audio and FaceTime Video. Pick FaceTime Video.
- Let it ring: If the call doesn't connect immediately, you'll need to wait for it to ring out.
- Start recording video: You'll see two options again, one with a green "Call Again" button and the other with a white "Record Video" button. Tap the second option (Record Video).
- Wait for the countdown: A countdown will begin, giving you some time to prepare what you want to say.
- Record your video and stop when done: Once you're finished recording and happy with your video, press the stop button.
- Send the video: If you're ready to send the video, tap the send button at the bottom of the screen. Your video will be sent to the contact.
3. Check In for a Destination: Share Your Arrival
The Check In feature allows you to inform friends or family when you reach a destination, offering peace of mind with automatic notifications upon safe arrival.
Steps to Use Check In Feature on iOS 17:
Use an iPhone with iOS 17 to Check In with Someone:
- Step 1: Open the Messages app and select the conversation with the person you want to check in with. Tap the plus button (+) to the left of the text field. Scroll through the iMessage apps and choose "Check In."
- Step 2: If it's your first time using Check In, follow the on-screen instructions. You'll be asked to decide how much information to share:
Limited: Shares your current location, battery status, and network signal for your iPhone and Apple Watch (if you have one).
Full: Includes the above data plus your route, and information on your last iPhone unlock or Apple Watch removal. - Step 3: Tap the blue arrow in the message field to send your Check In. You can also edit your destination or set a specific time for your Check In.
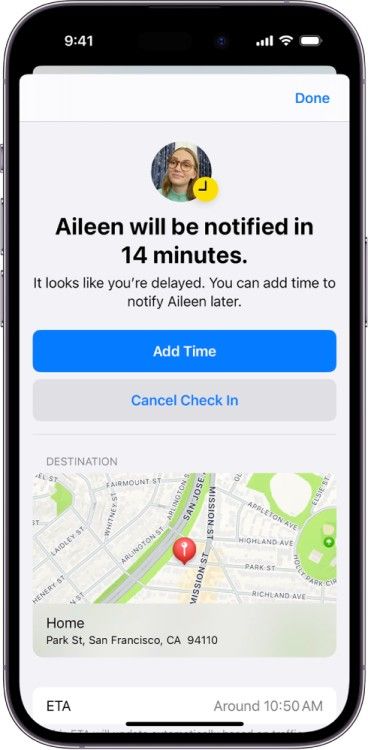
- Step 4: If you need to cancel your Check In, tap the "Details" button on the Check In message. You'll find the "Cancel Check In" option there, along with your destination, ETA, and sharing settings.
- Step 5: If your journey is delayed, Check In will prompt you to add more time. If you don't respond within 15 minutes, it will notify the people you're checking in with and share the agreed-upon location data. When you add time, your ETA will be updated.
- Step 6: Once you've safely arrived at your destination, Check In will automatically end, and your data sharing will stop. The person you're sharing with will receive a notification, and your conversation will reflect that you've arrived safely.
4. Interactive Widgets: Supercharge Your Home Screen
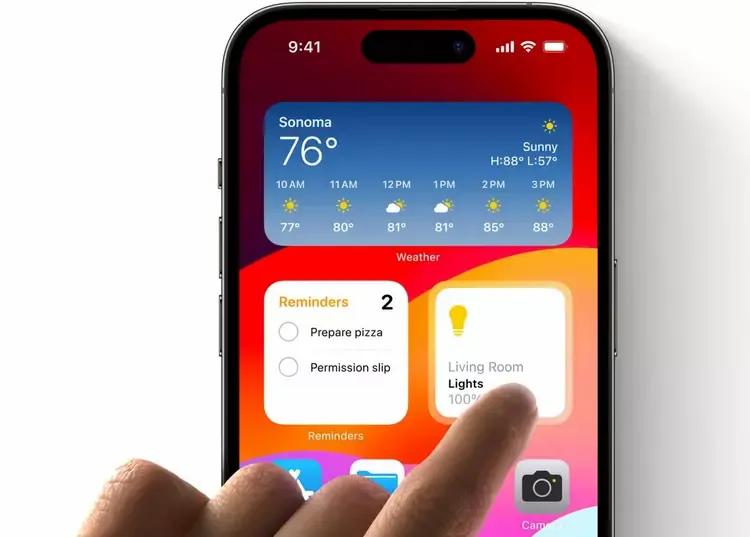
Widgets, a favorite among iPhone users, receive a significant upgrade in iOS 17. Now, widgets become interactive, allowing you to perform actions directly within them. For instance, the Reminders widget enables you to check off tasks without opening the app, while home screen widgets let you control smart home devices with a tap.
Steps to Use interactive widgets in iOS 17:
To utilize interactive widgets in iOS 17, you should place them on your home screen. After doing so, you can seamlessly interact with these widgets without the need to launch the corresponding app.
Here's a detailed guide to help you with this process:
- Step 1: Press and hold anywhere on your home screen until the icons start to wiggle.
- Step 2: Look for the "+" icon in the top-left corner and tap it. This action will bring up a list of available widgets.
- Step 3: From the list, select the widgets you want to add. You can choose the widget's size and then either drag it to your Home Screen or click the "Add Widget" button.
- Step 4: For example, if you select the Reminders widget, you can mark a task as done directly from your home screen.
You can add interactive widgets for various Apple applications using this method.
5. Downloadable Maps: Navigate Offline with Ease
iOS 17 enhances Apple Maps with a crucial feature – downloadable maps. You can now download map areas to your device, ensuring accessibility even without an internet connection. This is an invaluable boon for travelers and outdoor enthusiasts exploring remote areas.
Steps to use Offline Maps on iOS 17:
To use Offline Maps, make sure the iPhone is running on iOS 17.
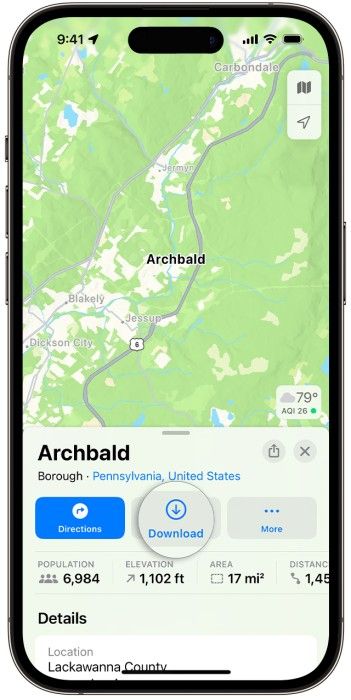
- Step 1: Start by opening the Apple Maps app and look for your initials at the bottom right corner.
- Step 2: Next, tap on "Offline Maps."
- Step 3: In the Offline Maps section, select "Download New Map."
- Step 4: Use the search bar to type the name of the place you want to save for offline use. If it doesn't show up, don't worry; you can find it in the next step.
- Step 5: A box will appear for you to pick the map area you want to download. If you couldn't find your place earlier, you can now move the box to cover the area you need.
You can zoom in or out and drag your finger on the map to get it just right. To select the map area, tap, hold, and move the anchor points. Wait for the download to finish, and you'll see it in your Offline Maps.
Now, you can use Maps like you normally would. If you don't have a cell signal in that area, your downloaded map will let you plan routes and navigate within it, even without an internet connection. It's like having the internet where you thought you wouldn't.
6. Safari Profiles: Separate Work and Personal Browsing
Safari, iOS's premier browser, introduces profiles in iOS 17. This feature enables you to create distinct browsing profiles for work and personal use. Each profile maintains its history, bookmarks, tab groups, and extensions, enhancing your web experience.
Steps to use Separate Safari Profile on iOS 17:
- Step 1: Go to Settings > Safari, then tap "New Profile."
- Step 2: Choose a name, icon, and color for this profile.
- Step 3: Under "Settings," tap "Favorites" to pick a bookmarks folder.
- Step 4: If you have multiple bookmark folders, this setting selects which folder's websites are suggested when you type in the address bar or search. For example, if you have a work-related folder, create a work profile and use this to make sure those websites are recommended.
- Step 5: Tap "Open New Tabs" and select the page you want new tabs to open.
7. Improved Siri: Streamlined Voice Commands
With iOS 17, interacting with Siri becomes more seamless as users can initiate the voice assistant by simply saying "Siri" instead of the previous "Hey Siri." This streamlined approach simplifies starting and maintaining conversations with Siri.
8. Autofill Sentences: Save Time Typing
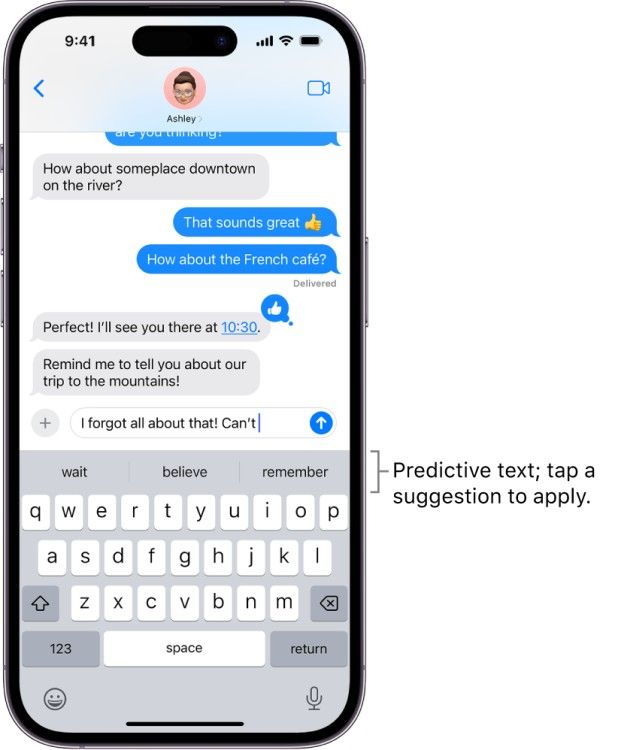
iOS 17 introduces autofill sentences. As you begin typing, the iPhone suggests complete sentences. A simple tap of the space bar accepts the suggestion, saving you time and effort.
9. Readable Audio Messages: Enhance Message Accessibility

Audio messages received in iOS 17 are automatically transcribed, making them readable when you can't listen to them. This feature is especially useful in noisy environments or during meetings.
10. Expanded Call History: Keep Track of Calls
In iOS 17, the Recent section of your call history offers a more extensive record, giving you a comprehensive overview of your communications.
Previously, iPhones were limited to storing just the latest 100 entries in the call history section. This restriction was problematic for users who made numerous calls through various apps. However, there's good news now – users can access their call history for up to 2,000 calls with iOS 17, covering not only regular calls but also FaceTime and WhatsApp calls.
11. Separate Ringtones for Dual SIM: Distinguish Calls Easily
Dual SIM users can assign distinct ringtones to each SIM card, simplifying the identification of personal and work-related calls.
Steps to use distinct ringtones on dual sim on iOS 17:
If you're using two different phone numbers on your iPhone and want to assign distinct ringtones to each, this section will be quite helpful. Below, we've presented a simple, step-by-step guide to assist you in setting separate ringtones for different phone numbers on your iPhone running iOS 17:
- Step 1: Open the Settings app on your iPhone.
- Step 2: Navigate to the "Sounds & Haptics" section.
- Step 3: In the subsequent menu, select "Ringtones."
- Step 4: You'll find two options here – "Personal" (your primary phone number) and "Secondary" (self-explanatory). Choose the number for which you wish to set a unique ringtone.
- Step 5: Now, pick your preferred ringtone from the list for the selected phone number and tap on it.
After you've set your chosen ringtone for the selected phone number on your iPhone, you can repeat the same steps to assign a ringtone to the other phone number on your device.
12. Silence Unknown Callers: Enhance Privacy
iOS 17 lets you automatically decline incoming FaceTime calls from unknown contacts, providing a layer of privacy and reducing unwanted interruptions.
Steps to activate or deactivate the "Silence Unknown Callers" feature for Facetime calls on iOS 17.
- Step 1. Access the Settings menu and select the FaceTime option.
- Step 2. On the FaceTime settings page, locate and tap on the "Silence Unknown Callers" feature.
- Step 3. Finally, switch on the "Silence Unknown Callers" toggle to enable this function.
That's all there is to it. This is how you can enable the "Silence Unknown Callers" feature for both Phone and FaceTime calls.
13. End-to-End Encryption: Secure Your Data
Data shared with friends stays private and secure with end-to-end encryption, safeguarding your messages and personal information.
Conclusion
iOS 17 is a game-changer, introducing a plethora of features that enhance convenience, privacy, and personalization. From simplified communication to improved user experiences, Apple's iOS 17 sets new standards in mobile operating systems. Update your iPhone today to experience these 15 mind-blowing features firsthand.